Explore guides for submitting AI workloads and registering GPU nodes on Jungle Grid. Whether you're running inference, training, or fine-tuning, the platform handles hardware placement for you.
Start with the CLI demo if you want the operator flow. Start with the Claude demo if you are wiring agents into workload execution. Both show the same abstraction: describe the workload, then let Jungle Grid handle fit and placement.
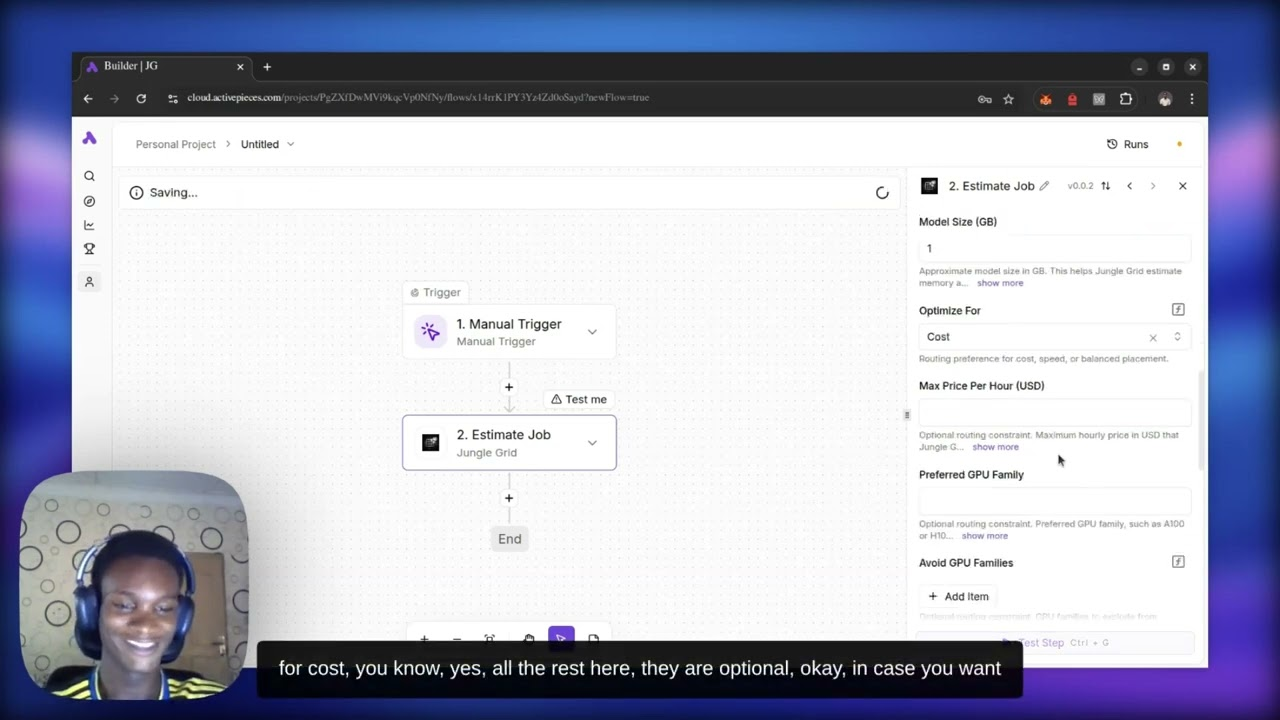
See a real AI workload run from an Activepieces workflow through Jungle Grid Ready Paths — from trigger to completed result in 31 seconds, without manually provisioning or selecting GPUs.
The same CLI and browser entry points serve both paths. Choose the role that matches what you want to do, then follow the steps.
Session flow
Use the browser to choose the user identity, then start the CLI with npx to submit your first workload by intent instead of by hardware.
BrowserCreate an account or sign in, then choose the Run jobs identity before you enter the portal.
CLIAuthenticate with npx @jungle-grid/cli@latest login, submit a workload, and keep the flow hardware-agnostic.
PortalUse /portal to confirm your session, review job history, and watch status changes from one place.
Setup
What every starter should line up first.
The browser and CLI work together. Account creation, identity choice, and the portal start in the browser. Submission and node management move into the CLI after that.
Shared entry points
Create an account at /signup or sign in at /login.
Choose a role up front: Run jobs or Provide GPUs.
A successful browser sign-in lands you in /portal.
CLI basics
Start the CLI with npx on a machine that already has Node.js 18+.
Use npx @jungle-grid/cli@latest login to connect the terminal to the same account you opened in the browser.
User workload submission needs a public container image; provider runtime install is managed automatically by the CLI when you start a node.
Set JUNGLE_GRID_API only when your team points at a non-default environment.
Managed fleet operators
Constrained providers like RunPod Pods no longer require a standalone controller install.
When you use Docker Compose, put RUNPOD_API_KEY and the RunPod cloud/disk/timeout settings in the repo-root .env, then restart the orchestrator service.
The scheduler can provision direct RunPod workload capacity on demand when a queued job cannot dispatch immediately.
Managed-capacity logs now call out pod creation, status transitions, running/completed/failed milestones, scarcity backoff, and teardown.
Managed RunPod pods are torn down automatically after the job reaches a terminal state.
Provider-only checks
Your host needs a dispatch URL that the orchestrator can reach.
Node registration asks for payout bank and account details.
nvidia-smi must be available unless you are intentionally running in simulation mode.
Self-hosted machines and VM/root-capable rented machines still use the standard node-agent runtime.
Constrained providers like RunPod Pods are now orchestrator-managed through direct workload pods.
Use npx @jungle-grid/cli@latest node install-agent if you want to pre-install or refresh the managed node-agent before starting the daemon.
Guided path
Choose one path and finish it cleanly.
The steps below are the current product truth. They use the existing sign-in pages, portal route, and CLI commands already supported today.
Run jobs
01
Choose the job-submitter identity in the browser
Start with account creation or sign-in. When prompted for a role, choose Run jobs so your first session opens the user view.
02
Start the CLI on your working machine
Use npx on the machine where you want to submit and inspect workloads from the terminal. You can add a global install later if you want the shorter jungle binary on your PATH.
npx @jungle-grid/cli@latest login
03
Confirm the CLI session
After the first browser-backed login, verify that this machine is attached to the right Jungle Grid account before you submit real work.
npx @jungle-grid/cli@latest whoami
04
Submit a first workload
Describe what you want to run, not what GPU you want. The orchestrator handles classification and placement.
Jungle Grid chooses placement internally. Your submit flow stays focused on workload type, model size, and optimization preference.
Troubleshooting
Quick fixes for first-session failures.
These are the current friction points the product already expects: device-flow login, identity choice, empty portal states, and provider readiness.
That is still a valid flow. The CLI prints a login URL and a device code, and the login page can be completed from any browser session.
npx @jungle-grid/cli@latest login --no-browser
Return to the account sign-in flow and choose the identity you actually want for this session. Jungle Grid treats user and provider sessions separately.
The portal reflects the active role. Users need to submit a workload before jobs appear. Providers need to register and start a node before the provider table fills in.
Set JUNGLE_GRID_API before npx @jungle-grid/cli@latest login if your CLI should target a different orchestrator URL than the default.
Confirm your dispatch URL is reachable, the host exposes nvidia-smi unless you are simulating, and you can provide payout details when prompted during registration. If the managed runtime needs to be repaired or preloaded, run an explicit node-agent install before retrying start.
Keep the standard node-agent flow for self-hosted or VM/root-capable machines. For RunPod Pods, give the orchestrator RUNPOD_API_KEY plus the RunPod cloud, disk, and timeout settings, then restart the orchestrator. When local capacity is unavailable, Jungle Grid creates the real user workload pod directly on RunPod, keeps the job queued until that workload reaches running, broadens across compatible managed GPU tiers when RunPod is temporarily full, and retries with backoff instead of failing immediately.
docker compose -f infra/docker/docker-compose.yml up -d --build redis orchestrator
Move into the product
Keep the browser open, then complete the CLI steps on the machine you actually want to use.
The fastest clean path: choose the right identity, run jungle login, do one real action, and verify it in /portal before you move on.